Using the content block editor
When you edit a content block in T4, you are using its "TinyMCE editor."
This page is a guide to all controls in T4's TinyMCE editor.
(Note: Use standard interface when using content block editor)
Take a full tour of the TinyMCE editor
Or, browse its controls alphabetically:
Alignment | Anchors | Blockquote | Bold | Bulleted list | File embed | Format eraser | Headers (H1-H6) | Horizontal separator | Image | Indent | Italics | Links (internal) | Links (external) | Numbered list| Photo| Special characters | Spellcheck | Sub/superscript | Undo | Video
Moving left to right across its controls
Undo/Redo

Click the back arrow to undo your last action(s) and the forward arrow to redo.
Bold / italics / underline

To bold or italicize a line of text, highlight it with your mouse and click B to bold the line or I to italicize the line.
You should avoid using underline on the web because people associate underlined text with hyperlinks.
Alignment controls

As a rule, your text should be aligned left, so that is the default. You can change this by highlighting your text and clicking another option such as centre alignment, if you want to centre a line of text or an image on your page.
Running left to right across the controls your options are:
Left align
Centre align
Right align
Justified text, which adds space between words to stretch it margin to margin
Bulleted or numbered lists

Bulleted or numbered lists are a great way to break up text on your page so it is more visually appealing to your site visitors.
To create a bulleted list or numbered list, create a list of the words or lines you want to bullet or number, and make sure they are all on their own separate line like this:
sample bulleted line 1
sample bullet line 2
another bulleted line!
Now, highlight these lines with your mouse and click the bullet or number list icon and it will convert to a list:
- sample bulleted line 1
- sample bullet line 2
- another bulleted line!
- sample bulleted line 1
- sample bullet line 2
- another bulleted line!
If you find your cursor stuck in a list you have finished creating, just click enter again to stop building a list (or click the list icon to stop creating a list).
Indent

To indent, or remove an indent use the indent icons displayed above. Simply highlight a word, line, or paragraph and click the indent button to indent.
Sample indent.
You can click indent again and again to further indent a word or line.
Sample indent 2.
Use the decrease indent icon to remove indents or to exit indent mode if you find your cursor stuck in an indent.
Create a link: Internal links

When you click your link icon, it will offer you 4 options for creating a link.
The first option is: "link to another page."
Use this option to create an internal link to another page on your own site. Internal links are great because they will not break if you alter your site structure or edit a section/page name.
Create a link: Link to a content type

When you click your link icon, it will offer you 4 options for creating a link.
The second option is a "link to content in a page."
Use this option to link to a specific content block on a specific page on your own site. For example, if you want to link to a Google Map on one of your pages, you would use this link.
Create a link: External links

When you click your link icon, it will offer you 4 options for creating a link.
The third option is a "Link to external site."
Use this option when you are linking to a page on an external website, or a page on a Memorial website other than your own. Learn how to create an external link.
Create a link: Anchors

When you click your link icon, it will offer you 4 options for creating a link.
The fourth option is an "anchor."
Anchors allow you to link to a different part of the same page, For example: click this link to return to the top of this page.
Learn how to create anchors on your page.
Remove a link

To remove a link on your page you can either delete the hyperlinked line of text using your keyboard, or you can highlight the hyperlinked text and click the "unlink" button circled above.
Insert an image

To insert an image on your page, click the "insert file link or image" icon shown above, then follow these instructions to add an image on your page.
Insert a link to a file

To insert a link to a file on your page (such as a PDF or Word document), use the "insert file link or image" icon shown above, then follow these instructions to
Spellcheck

To check your page for spelling errors, click the spellcheck button (circled above).
If the spellchecker finds any words it believes are typos, it will underline the word in red. You can click any underlined word, and it will provide you with a list of correctly spelled alternatives to your word. Click the suggested alternative if you want to replace your word with the suggested word.
Format Erasure

Sometimes when you copy text from another website or a word document or PDF, and paste that text onto your page, you'll notice formatting errors like strange line breaks or characters. To remove these formatting issues from your copy and pasted text, highlight the text with your mouse and click the "remove formatting" button.
Note: this will also strip away font treatments like bold or italics, as well as hyperlinks.
Insert a video

In order to insert a video on your page, you must first upload the video to your unit's YouTube channel, or put in a request for MarComm to upload your video to Memorial's YouTube Channel. Video files are large and would slow your page down, so we use YouTube embeds instead.
Once your video is uploaded to YouTube you can embed it on your page by clicking the "insert video" button in your page editor. on your page.
Additional Controls
Special characters
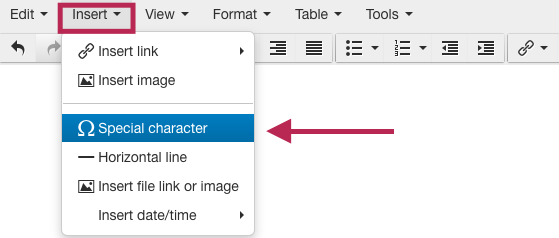
T4 allows you to insert various special characters not available on your keyboard, such as an em dash (—) or a German umlaut (ö).
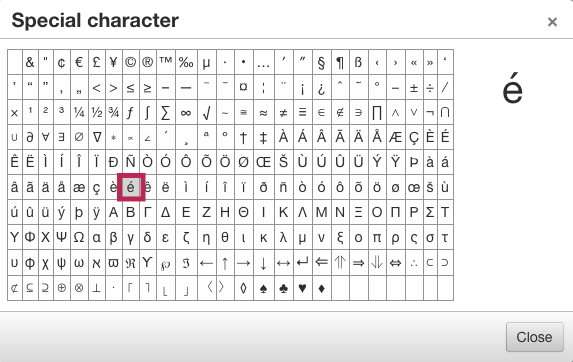
To insert a special character, place your mouse cursor where you would like to insert the character, click "insert" and choose "special character" (as shown above). Choose a special character from the available list by clicking directly on the character. Doing so will insert the character:
Horizontal line
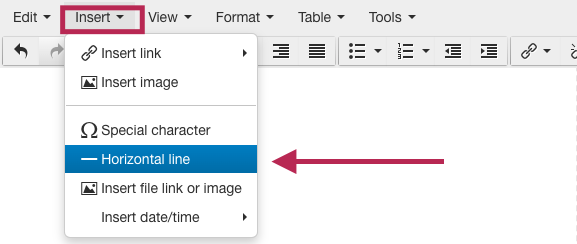
A horizontal line is a great way to visually separate different topics on the same page. You can see horizontal lines throughout this page, separating the different controls on your TinyMCE editor. To insert a horizontal line, click "insert" and choose "horizontal line."
Horizontal lines fill exactly one line no matter what size someone's monitor is, or whether they're on a cellphone, tablet, laptop, or desktop.
Superscript / Subscript
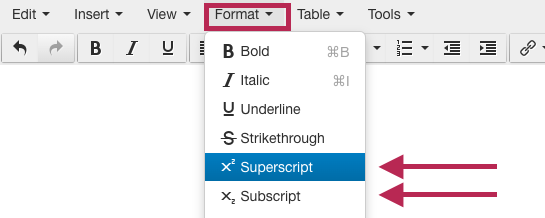
T4 offers the use of superscript (Xsuperscript) and subscript (examplesubscript) for use in a sentence that contains items like a footnote1, or a mathematical equation X3+ Y-1 = Z.
To insert superscript or subscript, write the word/character/sentence you want to render superscript or subscript, then highlight that word or line with your mouse. Now, click "format" and click superscript (or subscript).
Headers (H1 - H6)
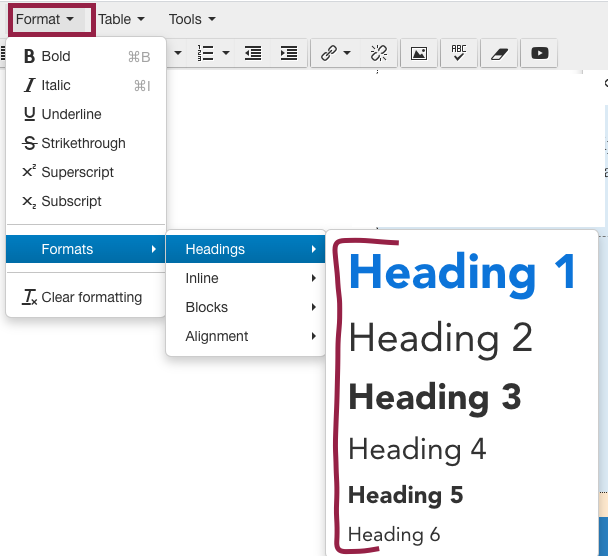
Headers are a very important part of building a page. Visually, they break your content up into sections so readers can easily find what they're looking for.
They're also important for accessibility and . Headers tells search engines what broad categories of information exist on your page, and visitors using a screenreader can jump from one header tag to another to quickly locate the content that is relevant to them
To create a header, simply write a line like "Graduate programs," and highlight the line with your mouse. Then, click "Format" then "formats" then choose "headings" and pick from the list of H1-H6. They differ only in their size and font weight.
Graduate programs | H2
Graduate programs | H3
Graduate programs | H4
Graduate programs | H5
Graduate programs | H6
Paragraph
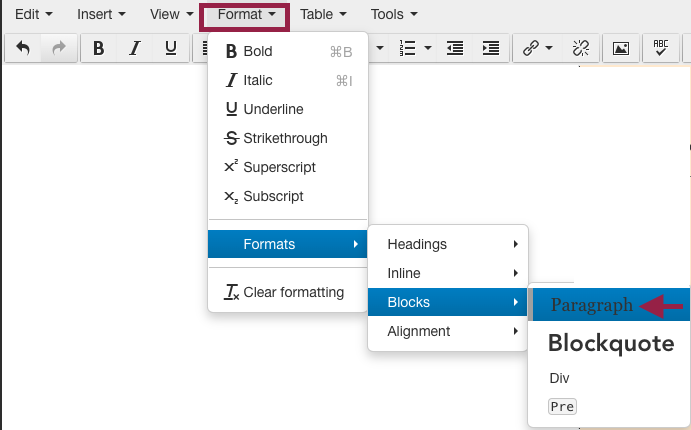
Paragraph format is the standard text treatment for body copy on your page (this sentence is in paragraph format). It is meant for writing the basic paragraphs on your page, while other text treatments, like headings, are meant for writing headlines.
By default, your text will appear in paragraph format, but if you want to render something like a header or blockquote into paragraph format, simply highlight the text with your mouse, click "format" choose "formats" then choose "blocks" and select "paragraph."
Blockquote
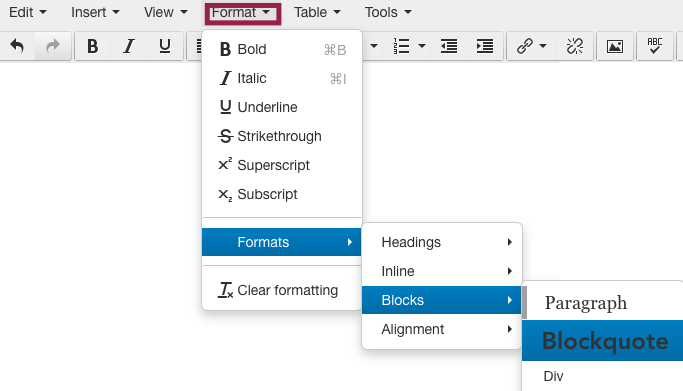
Blockquotes are a great way to emphasize the most important lines in your content or to highlight a stand-out quote in a news article.
To convert a line into a blockquote, simply highlight the line you want to convert into a blockquote, click "format" choose "formats," then click "blocks" and choose "block quote." Here is what a blockquote looks like:
Blockquotes are a great way to emphasize the most important lines in your content.